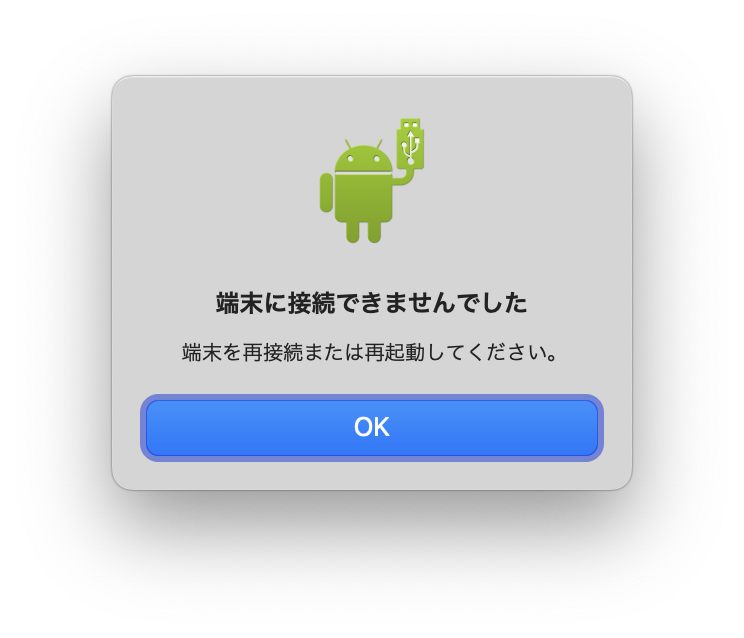
Android File Transfer cannot connect to Pixel 4 [技術]
If you have done all the other configurations necessary on your smart phone and still cannot use AFT with it:
 connect your phone to your Mac by USB, open the Terminal app, and run the following command. You may be asked to enter your password.
Do this in one line to ensure AFT is invoked immediately after the kill. If there is some interval between the two commands, another instance of ptpcamerad gets launched before AFT will come up.
Even when it succeeds, AFT window may not come to the front. In that case, use CMD+TAB or Dock to switch to the app.
Troubleshooting
If it does not work, here' s what I did to find out what was blocking.
Launch the Console app, filter by "android", start capturing logs, and launch Android File Transfer.
You may be able to identify what app is blocking AFT from connecting to the device.
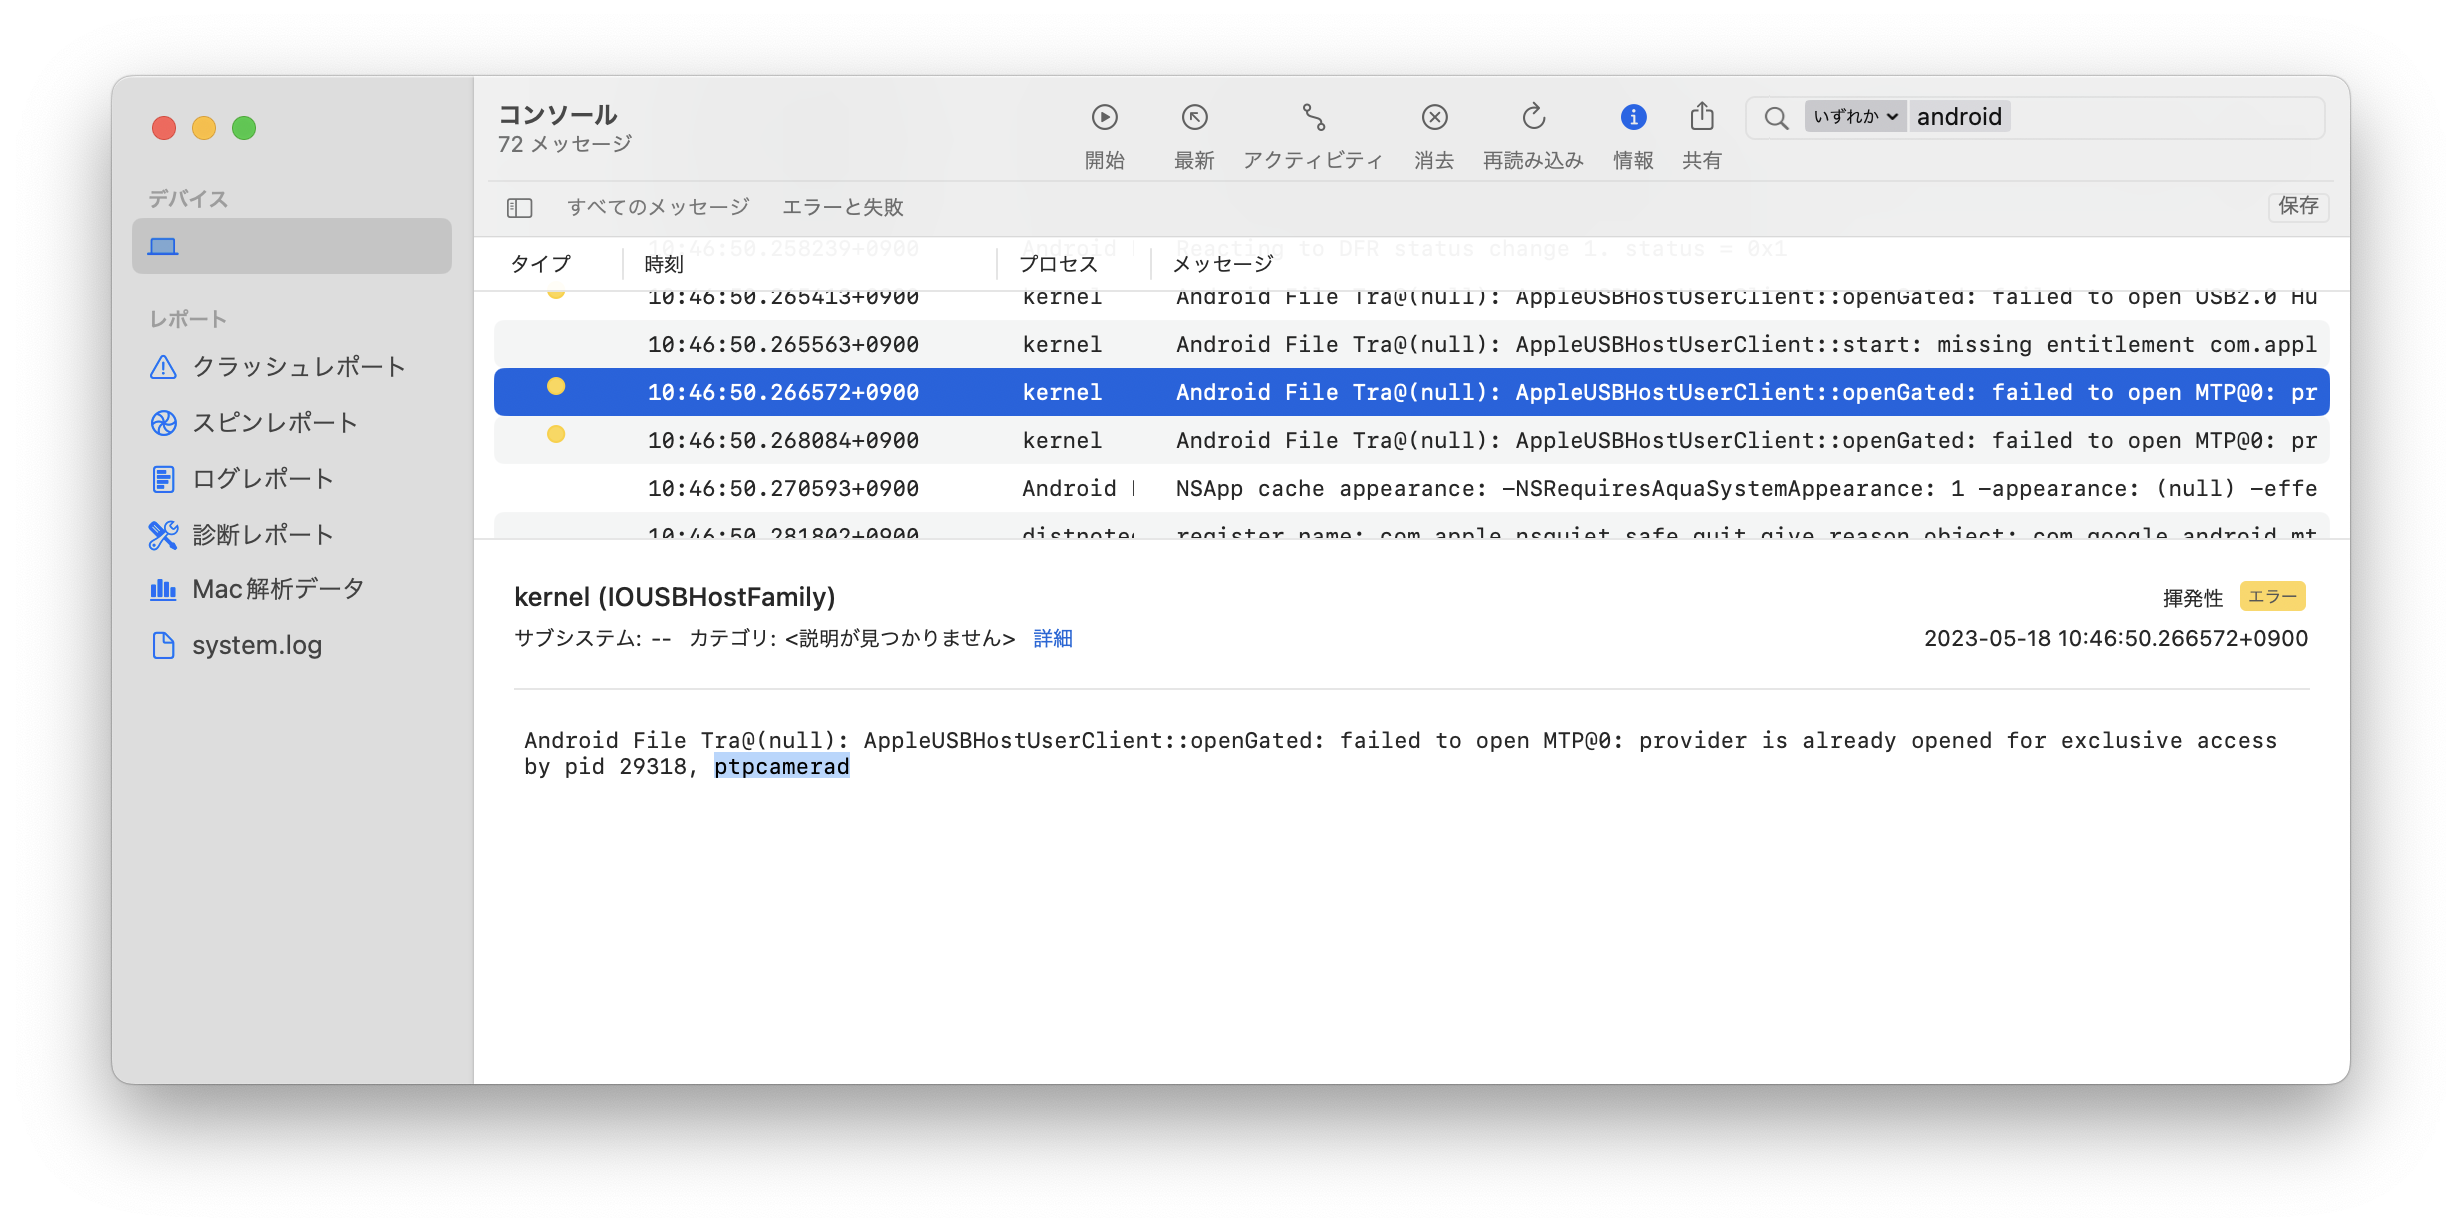
See the yellow dot to the left of the log? Try to find one like that. Click the line and the detail will appear in the bottom half. If the blocking process is not "ptpcamerad", then replace the "ptpcamerad" in the above command with the correct process name and try again.
sudo pkill -9 ptpcamerad; /Applications/Android\ File\ Transfer.app/Contents/MacOS/Android\ File\ Transfer &Do this in one line to ensure AFT is invoked immediately after the kill. If there is some interval between the two commands, another instance of ptpcamerad gets launched before AFT will come up.
Even when it succeeds, AFT window may not come to the front. In that case, use CMD+TAB or Dock to switch to the app.
Troubleshooting
If it does not work, here' s what I did to find out what was blocking.
Launch the Console app, filter by "android", start capturing logs, and launch Android File Transfer.
You may be able to identify what app is blocking AFT from connecting to the device.
See the yellow dot to the left of the log? Try to find one like that. Click the line and the detail will appear in the bottom half. If the blocking process is not "ptpcamerad", then replace the "ptpcamerad" in the above command with the correct process name and try again.
Windows 11を強制シャットダウンする設定 [技術]
以前に書いたこの記事の手順では、設定した時間を過ぎてもパソコンを使い続けられるという問題がありました。そこで、毎晩、決めた時間になったらWindowsを強制シャットダウンする設定を追加します。
基本的な方法は「タスクスケジューラ」と「shutdownコマンド」の組み合わせで、検索すると色々出てきます。たとえばドスパラのサイトが参考になります。
問題はノートパソコンで、電源の種類によってはタスクが起動されず、パソコンがシャットダウンできない場合がありました。
タスクスケジューラで新しくタスクを作ると、デフォルトの設定では下の画面キャプチャのように
「コンピューターをAC電源で使用している場合のみタスクを開始する」
と
「コンピューターの電源をバッテリに切り替える場合は停止する」
が有効になっています。
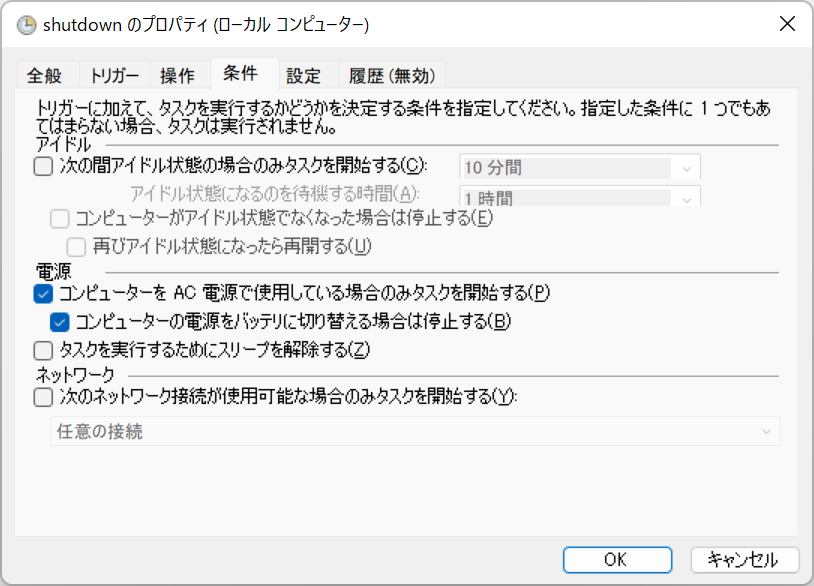
この状態では、ノートパソコンでACアダプターを外してバッテリーで使っている時にシャットダウンが動きませんでした。
タスクスケジューラにshutdownコマンドを設定しても期待通りにシャットダウンできない場合は、このパラメータを確認して、オンになっている場合は両方ともオフにします。これでどんな場合もタスクが起動され、パソコンが確実にシャットダウンできます。
基本的な方法は「タスクスケジューラ」と「shutdownコマンド」の組み合わせで、検索すると色々出てきます。たとえばドスパラのサイトが参考になります。
問題はノートパソコンで、電源の種類によってはタスクが起動されず、パソコンがシャットダウンできない場合がありました。
タスクスケジューラで新しくタスクを作ると、デフォルトの設定では下の画面キャプチャのように
「コンピューターをAC電源で使用している場合のみタスクを開始する」
と
「コンピューターの電源をバッテリに切り替える場合は停止する」
が有効になっています。
この状態では、ノートパソコンでACアダプターを外してバッテリーで使っている時にシャットダウンが動きませんでした。
タスクスケジューラにshutdownコマンドを設定しても期待通りにシャットダウンできない場合は、このパラメータを確認して、オンになっている場合は両方ともオフにします。これでどんな場合もタスクが起動され、パソコンが確実にシャットダウンできます。
積層式の3Dプリンターで設計より少し大きめに出力される理由 [技術]
久しぶりにちょっとした小物を設計してAdventurer3で出力したら、わずかにサイズが合わなかったので備忘録。
ノズル径が標準の0.4mmの場合、ノズルの経路の左右に大体0.2mmずつフィラメントがはみ出すらしい。はみ出すというのは語弊があるか。経路上に0.4mm幅のフィラメントが配置されていく。設計するときにはその分を差し引いてモデリングしないと、出力されたものの大きさが微妙に合わない。しばらく設計していなかったのですっかり忘れていた。
たとえば、直径8mmの丸い棒があり、そこに引っ掛けるためのフックを作ろうとしたら、モデルでは8.4mmの隙間を作っておかないと隙間が狭くて棒が挟まらないかもしれない。
合ってるかな。モノの設計技法なんかは習ったことがない文系ソフトウェアエンジニアなので、用語はあんまり知りません。悪しからず。
apache2 httpdで綺麗にディレクトリ表示する方法 [技術]
ネットを検索すると、httpdのディレクトリ表示はセキュリティがあーだ情報漏洩がこーだ、と否定的な記事が山盛りだが、社内のサーバーでファイル共有に使いたいといった用途には便利だ。気に入らない点は、アイコンが粗雑だったりWindowsで日本語表示させるとフォントが汚らしいこと。レイアウトもなんとなくダサい気がする。そこで、設定だけでどこまで変えられるのか挑戦してみた。
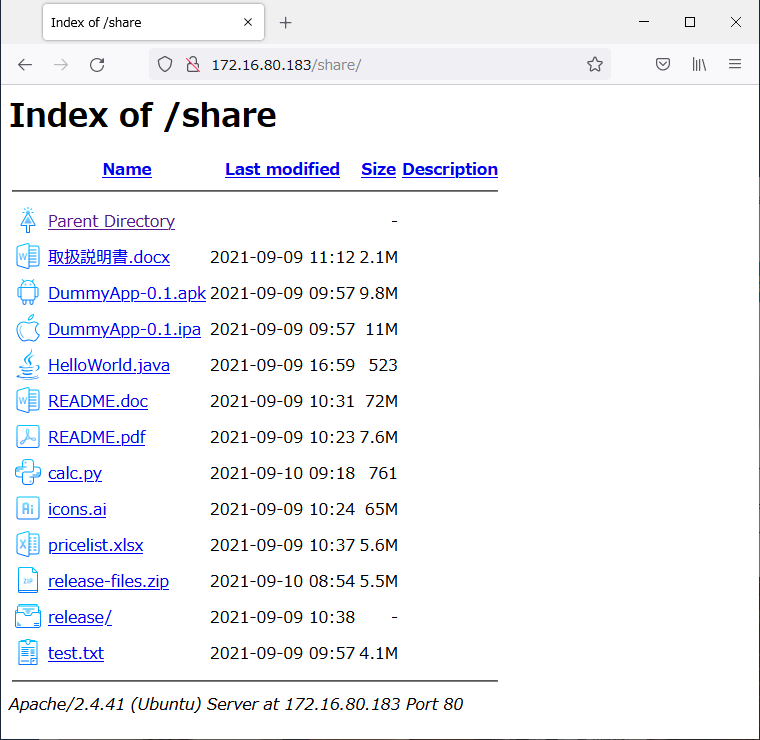
初期状態のファイル一覧をWindows 10のFirefoxで表示した状態がこれ。
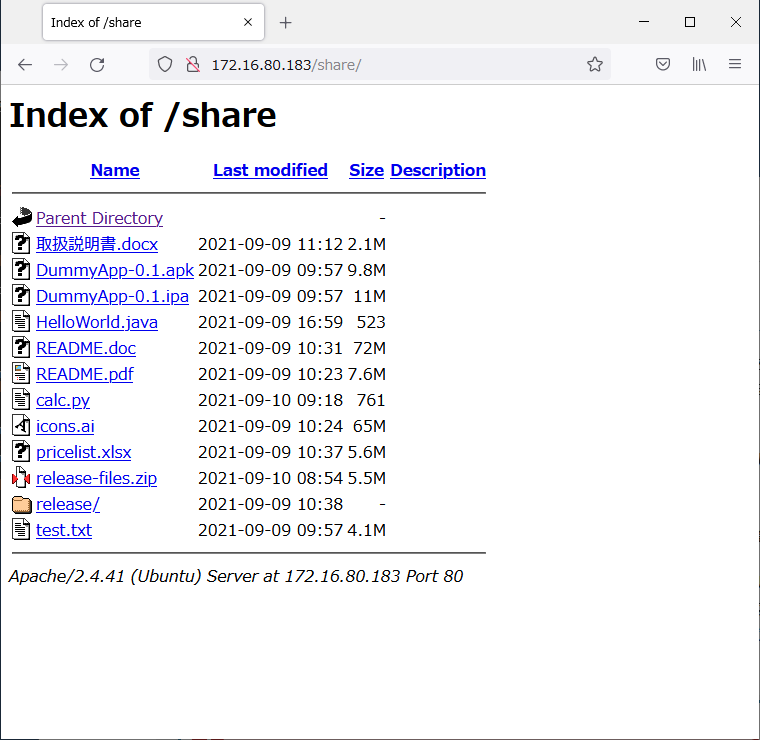
素の状態はダサい。
たとえばこのcursorアイコンは「親ディレクトリ」用に使える。httpdのディレクトリ表示で使うには、大きさは32px程度がちょうどよい。(以下のアイコンがpngなのはss-blogがsvgを受け付けないため。実際にはZIPアイコン以外はSVGがダウンロード可能なもの。)

そのほかにも無料で使えるアイコンの例


これらのアイコンをSVG形式でダウンロードしたら、httpdの設定ファイルを探し、初期状態のアイコン定義がどうなっているか確認する。Ubuntu 20.04の場合、次のように定義されていることがわかる。
つまり/etc/apache2/mods-available/autoindex.confですべてのアイコンを設定しているので、ここで定義されているアイコンをicons8からダウンロードしたものに変更する。以下のように追加し、デフォルトで設定されているアイコンの定義はすべてコメントにする。最下行のAddIconByTypeは最初から書かれている設定で、この上にアイコン設定を追加する。そうしないと一部のアイコン設定の効果が発揮されない。
また、DefaultIconのアイコンファイルもsvgに変更しておく。これにより、httpdに含まれている粗雑なアイコンが一掃される。
次に、ダウンロードしたsvgファイルをhttpdが管理しているディレクトリ下に移動する。まず既存のアイコンがどこにあるか確認する。
/usr/share/apache2/iconsにあることがわかったので、この中にサブディレクトリを作り、ダウンロードしたsvgを移動する。
httpdを再起動すると新しい設定が読み込まれる。
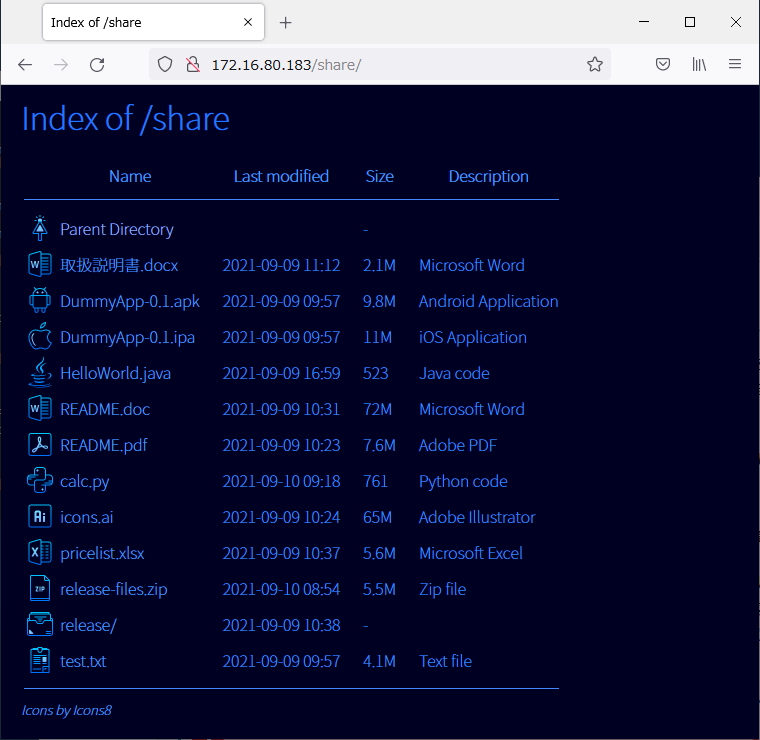
アイコン変更後、ブラウザで再読み込みするとこうなった。
小汚いアイコンはなくなったとはいえ、まだ全体的な見栄えは悪い。
次に、/autoindex.cssファイルを作成する。まず/がどのディレクトリにマッピングされるか調べる。
場所がわかったのでファイルを作る。このcssでNoto Sans JPフォントを読み込ませる。その他のタグについても色や間隔などを設定する。アイコンに合わせて文字は青系で統一し、背景を暗くしてみした。
最後に、アイコンをicons8.comから取得したことを明記するため、フッターを設定する。autoindex.confで次の設定をおこなう。最初からautoindex.confになんらかの設定がなされているので、パスを書き換える。
また、/autoindex-footer.htmlを作成し、icons8へのリンクを張る。
最終的にこうなった。
エンジニアのやっつけ仕事とはいえ、デフォルト状態よりはかなりマシになった。配色やアイコンはもう少し工夫の余地があるかもしれない。Windowsの設定が悪いのか、ちょっと暗めでフォントもぼんやりしている。
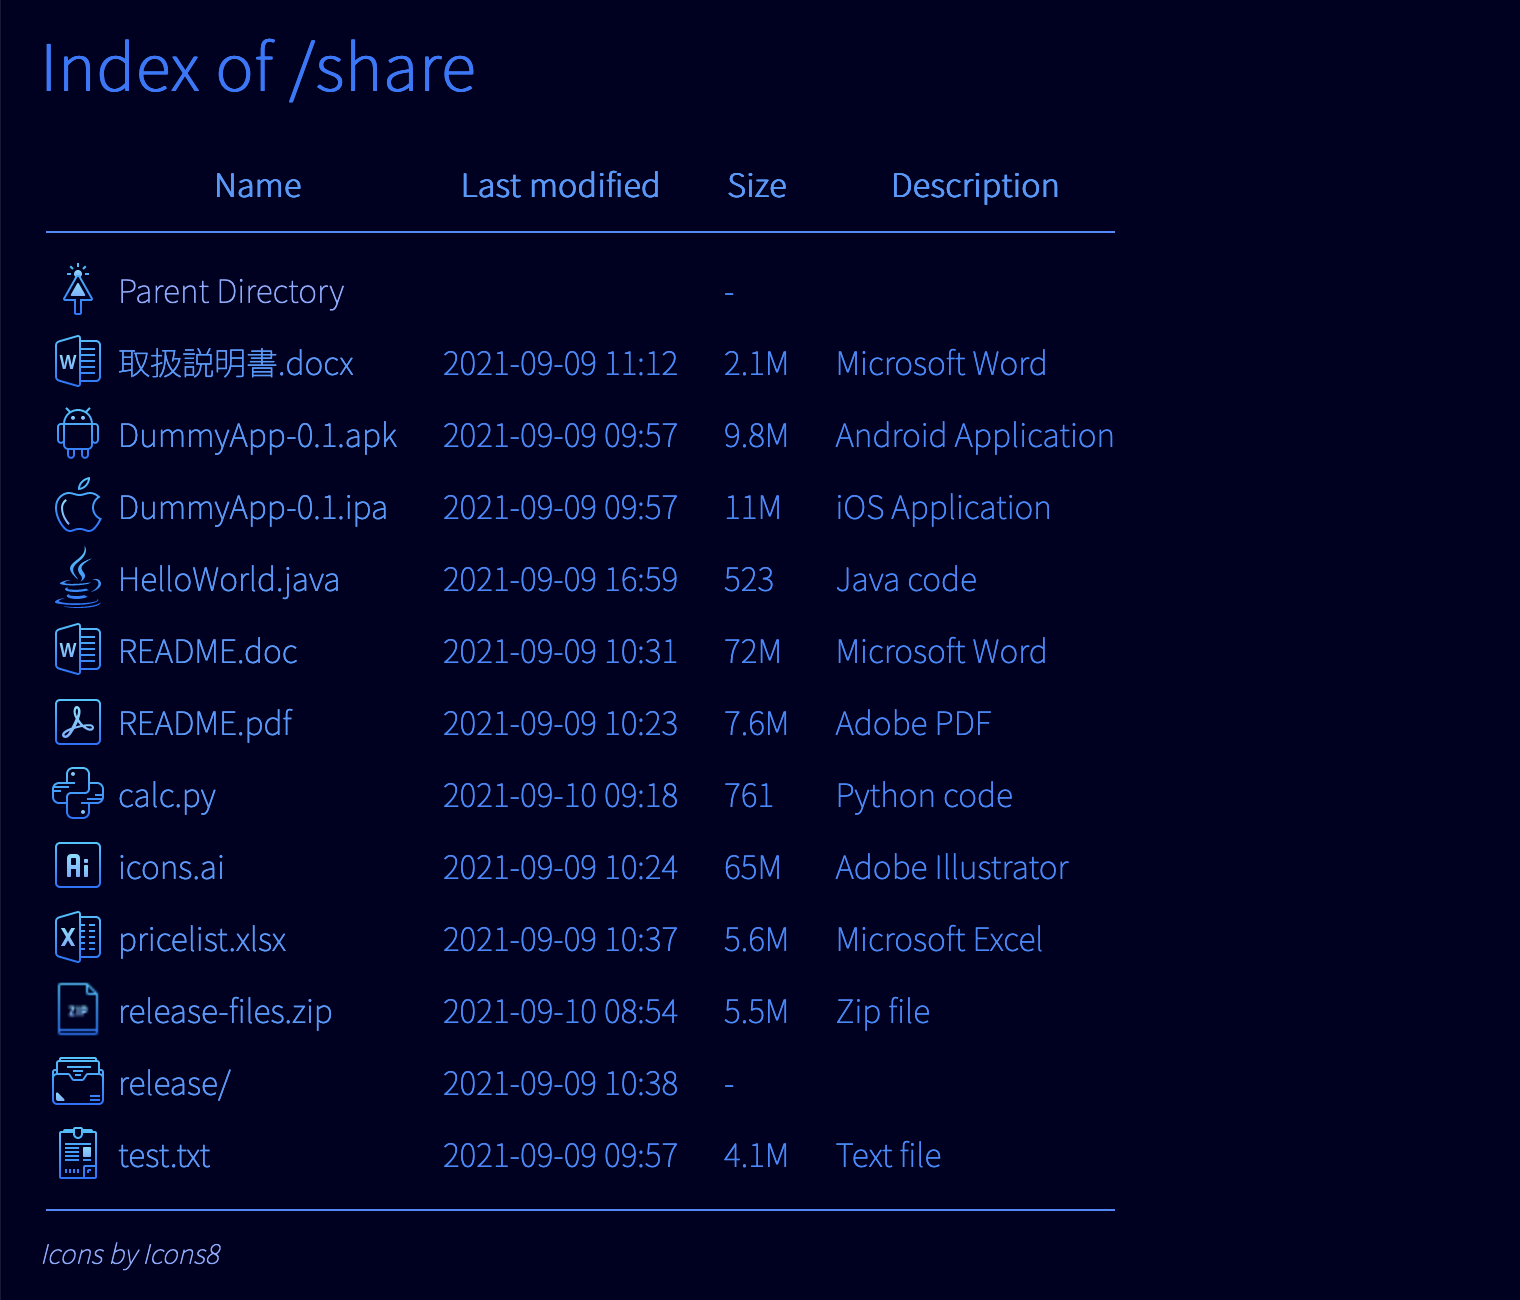
同じページをMacで表示するとこんな感じで、もう少し発色がよくて、フォントもはっきり見えるんですけどね。
初期状態のファイル一覧をWindows 10のFirefoxで表示した状態がこれ。
素の状態はダサい。
アイコン
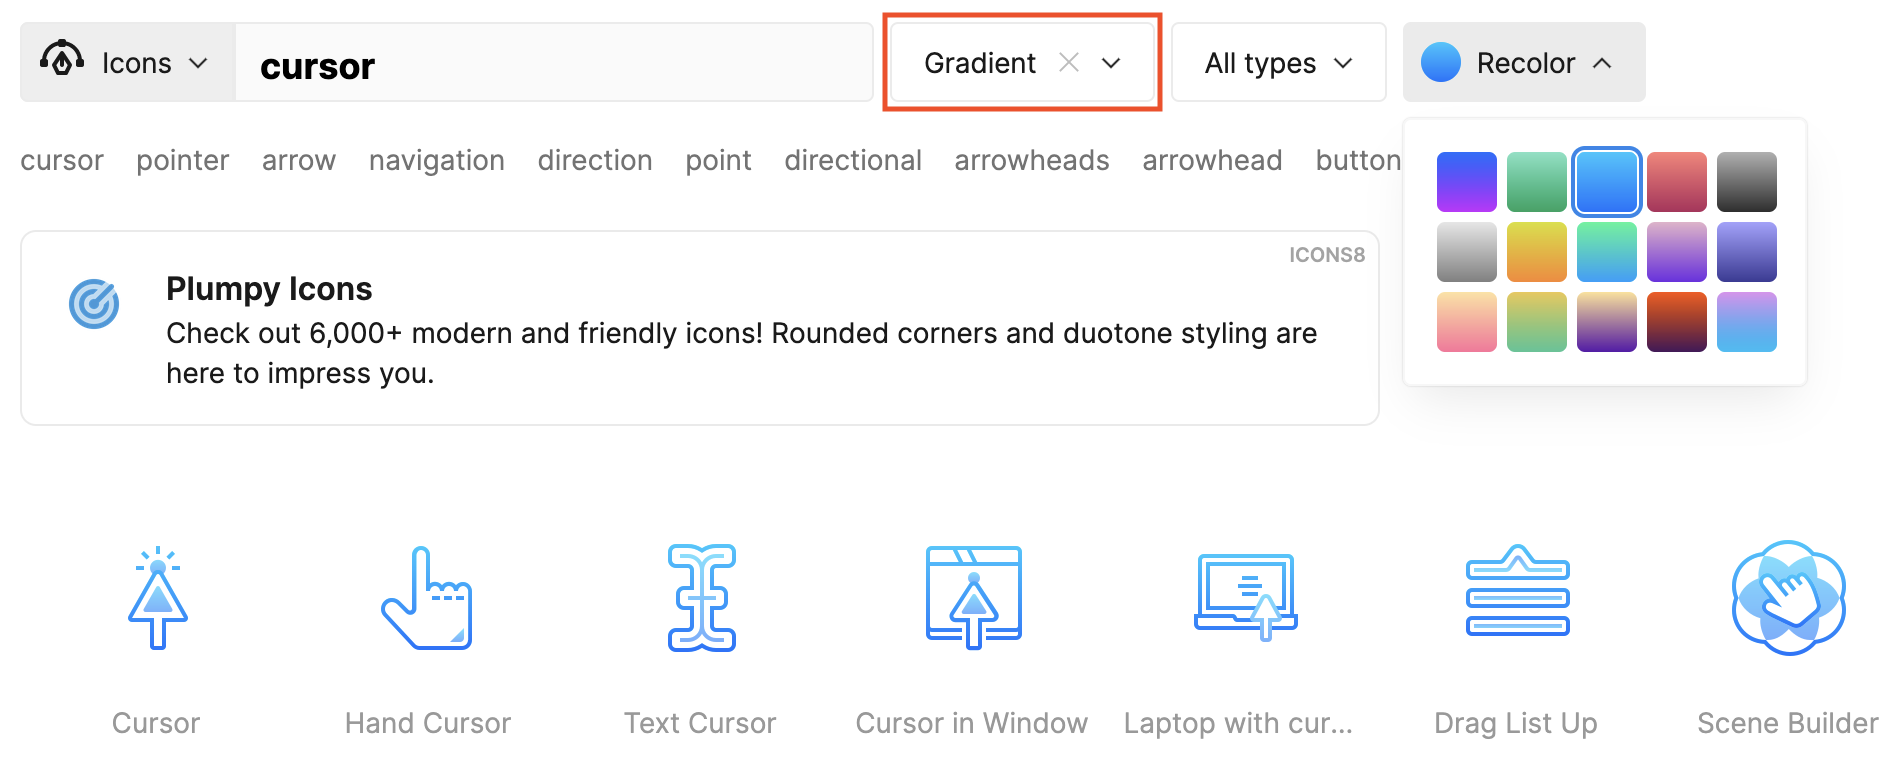
まずアイコン。今時、無料で綺麗なアイコンを提供しているサイトがいくつかある。今回はicons8からアイコンを拝借する。このサイトでは有料のアイコンが多いが、無料のSVGアイコンを探せばそれなりに綺麗なものが揃えられる。有料アイコンの場合、ダウンロードダイアログでSVGの横に錠前の絵が出るので、それ以外を探せばよい。SVGにするのは、拡大しても綺麗に表示されるから。検索する際にはAll stylesをGradientに変更し、色も好きなものを選ぶとよい。たとえばこのcursorアイコンは「親ディレクトリ」用に使える。httpdのディレクトリ表示で使うには、大きさは32px程度がちょうどよい。(以下のアイコンがpngなのはss-blogがsvgを受け付けないため。実際にはZIPアイコン以外はSVGがダウンロード可能なもの。)
そのほかにも無料で使えるアイコンの例
これらのアイコンをSVG形式でダウンロードしたら、httpdの設定ファイルを探し、初期状態のアイコン定義がどうなっているか確認する。Ubuntu 20.04の場合、次のように定義されていることがわかる。
# pwd
/etc/apache2
# grep -r unknown.gif .
./mods-available/autoindex.conf:	DefaultIcon /icons/unknown.gif
つまり/etc/apache2/mods-available/autoindex.confですべてのアイコンを設定しているので、ここで定義されているアイコンをicons8からダウンロードしたものに変更する。以下のように追加し、デフォルトで設定されているアイコンの定義はすべてコメントにする。最下行のAddIconByTypeは最初から書かれている設定で、この上にアイコン設定を追加する。そうしないと一部のアイコン設定の効果が発揮されない。
        AddIcon /icons/icons8/icons8-adobe-acrobat-reader.svg .pdf
        AddIcon /icons/icons8/icons8-adobe-illustrator.svg .ai
        AddIcon /icons/icons8/icons8-android-os.svg .apk
        AddIcon /icons/icons8/icons8-apple-logo.svg .ipa
        AddIcon /icons/icons8/icons8-cursor.svg ..
        AddIcon /icons/icons8/icons8-file.svg .txt
        AddIcon /icons/icons8/icons8-folder.svg ^^DIRECTORY^^
        AddIcon /icons/icons8/icons8-html-5.svg .html .htm .shtml
        AddIcon /icons/icons8/icons8-java.svg .java
        AddIcon /icons/icons8/icons8-microsoft-excel.svg .xlsx .xls
        AddIcon /icons/icons8/icons8-microsoft-powerpoint.svg .pptx .ppt
        AddIcon /icons/icons8/icons8-microsoft-word.svg .docx .doc

        AddIconByType (TXT,/icons/text.gif) text/*
また、DefaultIconのアイコンファイルもsvgに変更しておく。これにより、httpdに含まれている粗雑なアイコンが一掃される。
DefaultIcon /icons/icons8/icons8-file.svg
次に、ダウンロードしたsvgファイルをhttpdが管理しているディレクトリ下に移動する。まず既存のアイコンがどこにあるか確認する。
# pwd
/etc/apache2
# grep -r 'Directory.*/icons' .
./alias.conf:	<Directory "/usr/share/apache2/icons">
/usr/share/apache2/iconsにあることがわかったので、この中にサブディレクトリを作り、ダウンロードしたsvgを移動する。
# mkdir /usr/share/apache2/icons/icons8
# mv icons8-* /usr/share/apache2/icons/icons8
httpdを再起動すると新しい設定が読み込まれる。
# apachectl restart
アイコン変更後、ブラウザで再読み込みするとこうなった。
小汚いアイコンはなくなったとはいえ、まだ全体的な見栄えは悪い。
フォントとCSS
Windowsでは、MSナントカフォントがいつまでも使われていたりして、なんとなくレンダリングが汚らしいのが残念。今時、無料で使えて綺麗なフォントがいろいろあるので、webサーバー側で強制的にフォントを指定してしまうといい。
今回使うのは、Googleから提供されているNoto Sans JP。このリンクを開くとフォントの取り込み方法が画面右下に表示されているので、CSSファイルに設定を行う。
ディレクトリ一覧で使うCSSはIndexStyleSheetで設定する。アイコン設定を行なったautoindex.confでIndexOptionsの下に次の設定を追加する。
IndexStyleSheet "/autoindex.css"
次に、/autoindex.cssファイルを作成する。まず/がどのディレクトリにマッピングされるか調べる。
 # grep -r DocumentRoot .

./sites-available/000-default.conf:	DocumentRoot /var/www/html

./sites-available/default-ssl.conf:		DocumentRoot /var/www/html
場所がわかったのでファイルを作る。このcssでNoto Sans JPフォントを読み込ませる。その他のタグについても色や間隔などを設定する。アイコンに合わせて文字は青系で統一し、背景を暗くしてみした。
# cat > /var/www/html/autoindex.css

@import url('https://fonts.googleapis.com/css2?family=Noto+Sans+JP:wght@100&display=swap');


html {

    font-family: 'Noto Sans JP Thin', 'Noto Sans JP', sans-serif;

}


body {

    margin-left: 20px;

    background-color: #002;

    color: #38f;

}


a {

    text-decoration: none;

}


a:link {

    color: #49f;

}


a:visited {

    color: #8af;

}


a:hover {

    color: #83e;

}


h1 {

    color: #27f;

}


hr {

    border: none;

    height: 1px;

    background: #48f;

}


.indexcollastmod, .indexcolsize, .indexcoldesc {

    padding-left: 20px;

}


address {

    color: #27f;

    font-size: 10pt;

    font-style: italic;

}
残りの設定
httpdのautoindexモジュールでは、拡張子ごとに説明を設定することができる。以下の最初の3行はすでにautoindex.confファイルの中に存在するのでコメントを外し、さらにその下の設定を追加する。 AddDescription "GZIP compressed document" .gz
AddDescription "tar archive" .tar
AddDescription "GZIP compressed tar archive" .tgz
AddDescription "Adobe PDF" .pdf
AddDescription "Adobe Illustrator" .ai
AddDescription "Android Application" .apk
AddDescription "iOS Application" .ipa
AddDescription "Parent Directory" ..
AddDescription "Text file" .txt
AddDescription "HTML file" .html .htm .shtml
AddDescription "Java code" .java
AddDescription "Python code" .py
AddDescription "Microsoft Excel" .xlsx .xls
AddDescription "Microsoft PowerPoint" .pptx .ppt
AddDescription "Microsoft Word" .docx .doc
AddDescription "Zip file" .zip
最後に、アイコンをicons8.comから取得したことを明記するため、フッターを設定する。autoindex.confで次の設定をおこなう。最初からautoindex.confになんらかの設定がなされているので、パスを書き換える。
ReadmeName /autoindex-footer.html
また、/autoindex-footer.htmlを作成し、icons8へのリンクを張る。
# cat > /var/www/html/autoindex-footer.html

<address><a href="https://icons8.com/">Icons by Icons8</a></address>
最終的にこうなった。
エンジニアのやっつけ仕事とはいえ、デフォルト状態よりはかなりマシになった。配色やアイコンはもう少し工夫の余地があるかもしれない。Windowsの設定が悪いのか、ちょっと暗めでフォントもぼんやりしている。
同じページをMacで表示するとこんな感じで、もう少し発色がよくて、フォントもはっきり見えるんですけどね。
tomcatでエラーが出てwarがデプロイできない [技術]
Macでtomcatのアプリがエラーで起動できなくなった。brewのtomcatが10.xになったのでいくつか修正して起動しようとしたら大惨事。
Stack Overflowの記事によれば、jarファイルが壊れているらしい。以下のコマンドで壊れているjarが見つかるので、warのビルド環境から削除する必要がある。
壊れたjarを参照しているソースコードはとりあえずコメント化するとか削除した。何かを実験していて放置していたらしいので(久しぶりなので忘れた)、特に実害なし。
org.apache.catalina.startup.HostConfig.deployWAR Webアプリケーションアーカイブ [/usr/local/Cellar/tomcat/10.0.5/libexec/webapps/app.war] を配備中のエラー
        java.lang.IllegalStateException: 子要素を開始できません。
...
        Caused by: java.util.zip.ZipException: zip END header not found
                at java.base/java.util.zip.ZipFile$Source.zerror(ZipFile.java:1585)
...
Stack Overflowの記事によれば、jarファイルが壊れているらしい。以下のコマンドで壊れているjarが見つかるので、warのビルド環境から削除する必要がある。
for j in $(find /path/to/lib -name '*.jar'); do jar -tvf $j > /dev/null 2>&1; [ "$?" -ne 0 ] && echo "$j jar is broken"; done
壊れたjarを参照しているソースコードはとりあえずコメント化するとか削除した。何かを実験していて放置していたらしいので(久しぶりなので忘れた)、特に実害なし。
MacOSのシェルスクリプトで通知を表示する方法 [技術]
Macで時間がかかるシェルスクリプトが終了した時に通知を表示して音も鳴らすには、osascriptコマンドが利用できる。
最後のGlassは/System/Library/Sounds/ディレクトリにあるファイルを指定する。
Linuxでも実行するシェルスクリプトの場合はOS判定すれば良い。以下はBashの場合。
通知が表示されない場合は、システム環境設定の「通知と集中モード」で「スクリプトエディタ」の通知を許可すること。
osascript -e 'display notification "18ファイルをダウンロードしました。" with title "download.sh" sound name "Glass"'
最後のGlassは/System/Library/Sounds/ディレクトリにあるファイルを指定する。
% ls /System/Library/Sounds/
Basso.aiff	Bottle.aiff	Funk.aiff	Hero.aiff	Ping.aiff	Purr.aiff	Submarine.aiff
Blow.aiff	Frog.aiff	Glass.aiff	Morse.aiff	Pop.aiff	Sosumi.aiff	Tink.aiff
Linuxでも実行するシェルスクリプトの場合はOS判定すれば良い。以下はBashの場合。
if [[ "$OSTYPE" == "darwin"* ]]; then
  osascript -e ...
fi
通知が表示されない場合は、システム環境設定の「通知と集中モード」で「スクリプトエディタ」の通知を許可すること。
Set up Windows 10 user for children without online account [技術]
A PC with Windows 10 Home has arrived to my household after all these years, and I have to set up a user for my children.
In order to use "Parental Control" on Windows 10, the standard way is to use the "family group" feature, and to do so, a MS-affiliated email account is necessary. However, I did not want to create an online account just to let my children use the PC. So I did some research and decided to use "local account" that is not linked to any online accounts, and restrict usage by some means other than "family group".
Two main purposes of parental control are:
Create a local account
First thing first. You need to create a local account on Windows 10 for a child. Please search the net. For example, this is the description from Microsoft. Do not give Administrator privilege to the local account.
Restricting time of use
Next step is to restrict time of use for the account. This must be done from parent's accout with Administrator privilege, too.
Restricting access to particular web sites
Use a DNS service here. DNS is the internet version of phone book. It can convert the domain name like "blog.ss-blog.jp" into an IP address like "99.84.142.5" before connecting to the web site. We use the OpenDNS FamilyShield service that can filter out domain names for inappropriate sites and redirect such access to a different page.
Normally, DNS server information is configured automatically along with PC's IP address by DHCP at startup, but you can configure DNS server information manually. Since the DNS servers by OpenDNS FamilyShield are 208.67.222.123 and 208.67.220.123, you need to configure Windows to use these IP addresses for DNS. Configuration steps are described in this page. This operation must be performed using an account with Administrator privilege, too.
If the above page is difficult, there maybe more descriptive web pages out there with screen shots. In these examples, they typically use Google's DNS server, 8.8.8.8, but this time you need to configure 208.67.222.123 and 208.67.220.123.
Note that the DNS configuration is against network interfaces, so it will be applicable to all users of the PC, not just children. Also, if your PC has multiple network interfaces like WiFi + Ethernet, it is recommended that you configure the DNS servers for all the interfaces.
Confirmation
Once you have done all the above, try testing if all settings are correct by logging on using the child's account and access the web sites that should be blocked. Also test the time frame settings by trying to logon with the child's account outside of permitted timeframe.
In order to use "Parental Control" on Windows 10, the standard way is to use the "family group" feature, and to do so, a MS-affiliated email account is necessary. However, I did not want to create an online account just to let my children use the PC. So I did some research and decided to use "local account" that is not linked to any online accounts, and restrict usage by some means other than "family group".
Two main purposes of parental control are:
- Restrict time of use
- Restrict access to particular web sites
Create a local account
First thing first. You need to create a local account on Windows 10 for a child. Please search the net. For example, this is the description from Microsoft. Do not give Administrator privilege to the local account.
Restricting time of use
Next step is to restrict time of use for the account. This must be done from parent's accout with Administrator privilege, too.
- Run Command Prompt in Administrator's mode.
In the Search Box at the lower left part of the screen, enter "command", and Command Prompt should show up in the search result. Right clich the Command Prompt and you will see "Run as administrator". Click it. - In the Command Prompt, execute "net use /times" command to configure time of use for the local account.
You cannot restrict total amount of time of use per day with this command, but you can configure the time frame in which your children can use the PC for each day of the week. For example, in order for user "michael" to be able to use the PC from Monday to Sunday between 7AM to 9PM, run the command as follows:
See Microsoft's page for details.C:\Windows\system32>net user michael /times:m-su,7am-9pm - In order to confirm the result of the above command, execute "net user" command without /times option.
C:\Windows\system32>net user michael
User name                    michael
Full Name
Comment
User's comment
Country/region code          000 (System Default)
Account active               Yes
Account expires              Never

Password last set            2021/05/15 18:54:13
Password expires             Never
Password changeable          2021/05/15 18:54:13
Password required            No
User may change password     Yes

Workstations allowed         All
Logon script
User profile
Home directory
Last logon                   2021/05/16 12:14:17

Logon hours allowed          Sunday 7:00:00 - 21:00:00
                             Monday 7:00:00 - 21:00:00
                             Tuesday 7:00:00 - 21:00:00
                             Wednesday 7:00:00 - 21:00:00
                             Thursday 7:00:00 - 21:00:00
                             Friday 7:00:00 - 21:00:00
                             Saturday 7:00:00 - 21:00:00

Local Group Memberships      *Users
Global Group memberships     *None
The command completed successfully.
Restricting access to particular web sites
Use a DNS service here. DNS is the internet version of phone book. It can convert the domain name like "blog.ss-blog.jp" into an IP address like "99.84.142.5" before connecting to the web site. We use the OpenDNS FamilyShield service that can filter out domain names for inappropriate sites and redirect such access to a different page.
Normally, DNS server information is configured automatically along with PC's IP address by DHCP at startup, but you can configure DNS server information manually. Since the DNS servers by OpenDNS FamilyShield are 208.67.222.123 and 208.67.220.123, you need to configure Windows to use these IP addresses for DNS. Configuration steps are described in this page. This operation must be performed using an account with Administrator privilege, too.
If the above page is difficult, there maybe more descriptive web pages out there with screen shots. In these examples, they typically use Google's DNS server, 8.8.8.8, but this time you need to configure 208.67.222.123 and 208.67.220.123.
Note that the DNS configuration is against network interfaces, so it will be applicable to all users of the PC, not just children. Also, if your PC has multiple network interfaces like WiFi + Ethernet, it is recommended that you configure the DNS servers for all the interfaces.
Confirmation
Once you have done all the above, try testing if all settings are correct by logging on using the child's account and access the web sites that should be blocked. Also test the time frame settings by trying to logon with the child's account outside of permitted timeframe.
子供用のWindows 10アカウントを作る方法 (子供用のメールアドレス不要) [技術]
いまさらWindows 10 Homeのパソコンが手に入り、子供用に設定する必要が出てきました。
Windows 10で子供用にペアレンタルコントロールをするには「ファミリーグループ」を作れとのことで、そのためにはアカウントごとにマイクロソフト系列のメールアドレスが必要らしいのですが、そのためだけに新しく子供用のメールアドレスを作る気になれませんでした。なのでネット上のアカウントには紐づかずPC内で完結する「ローカルアカウント」を子供用に作り、「ファミリーグループ」機能以外の方法で制限することにしました。
子供用アカウントの2大目的は
ローカルアカウントの作成
まず、子供用にWindows 10のローカルアカウントを作成する必要があります。作成方法はネットで検索してください。たとえばマイクロソフトの説明はこちらです。
利用時間帯制限
次に子供用アカウントでWindowsを利用できる時間帯を制限します。これも管理用アカウントで実行します。
特定サイトへのアクセス制限
DNSサービスを利用します。DNSは電話帳のようなもので、「blog.ss-blog.jp」のようなドメイン名を「99.84.142.5」のようなIPアドレスに変換するための仕組みです。この変換を行う時に不適切なサイトのドメイン名をフィルターして別のサイトへ誘導するようなOpenDNS FamilyShieldというサービスを利用します。
DNSサーバーの情報は普通はパソコンの起動時にDHCPでIPアドレスと共に自動的に設定されることが多いのですが、個別に設定することもできます。OpenDNS FamilySheldのDNSサーバーのIPアドレスは208.67.222.123と208.67.220.123ですので、これらのIPアドレスを使うようにDNSを設定します。詳しい設定方法はこちらに記載されています。これも管理用アカウントで実行してください。
もう少し優しい記事を参考にしたい場合は「windows10 DNSサーバーを手動設定する」で検索してわかりやすいページを探してみてください。設定例ではGoogleのDNSサーバーを使うことが多いようですが、今回使うのは208.67.222.123と208.67.220.123です。例にある8.8.8.8などと間違えないように注意してください。
このDNSの設定はネットワークインターフェースに対して行うので、子供だけでなくPC上のすべてのユーザーに適用されます。また、WiFiとイーサネットなど複数インターフェースがある場合は、すべてのインターフェースでこのDNS設定を行うことをお勧めします。
確認
設定は以上です。完了したら子供用のアカウントでWindows 10にログインし、制限したいサイトがちゃんとブロックされているかどうかブラウザで確認してみてください。設定した利用時間帯外でログインが制限されていることも確認してくださいね。
Windows 10で子供用にペアレンタルコントロールをするには「ファミリーグループ」を作れとのことで、そのためにはアカウントごとにマイクロソフト系列のメールアドレスが必要らしいのですが、そのためだけに新しく子供用のメールアドレスを作る気になれませんでした。なのでネット上のアカウントには紐づかずPC内で完結する「ローカルアカウント」を子供用に作り、「ファミリーグループ」機能以外の方法で制限することにしました。
子供用アカウントの2大目的は
- 利用時間帯制限
- 特定サイトへのアクセス制限
ローカルアカウントの作成
まず、子供用にWindows 10のローカルアカウントを作成する必要があります。作成方法はネットで検索してください。たとえばマイクロソフトの説明はこちらです。
利用時間帯制限
次に子供用アカウントでWindowsを利用できる時間帯を制限します。これも管理用アカウントで実行します。
- コマンドプロンプトを管理者モードで起動。
画面左下の検索ボックスに「コマンド」と入力すると検索結果に「コマンドプロンプト」が表示されます。ここを右クリックすると「管理者として実行」が表示されるので、これをクリックします。 - コマンドプロンプトでnet user /timesコマンドを実行して時間を制限。
「1日2時間まで」のような総利用時間の制限はできませんが、曜日ごとにXX時からXX時まで利用を許可することができます。たとえば、ユーザー名「taro」に対して「月曜日から日曜日まで、朝7時から夜9時まで利用可能とする」場合、次のようなコマンドを実行します。
詳細はマイクロソフト(英語)のサイトに説明があります。マイクロソフトの日本語ページは見つけられませんでしたが、検索すれば同等の日本語の情報が出てきます。C:\Windows\system32>net user taro /times:m-su,7am-9pm - 設定の確認は/timesオプションをつけずにnet userコマンドを実行します。
このように、曜日ごとに利用可能な時間が表示されます。C:\Windows\system32>net user taro ユーザー名 taro フル ネーム コメント ユーザーのコメント 国/地域番号 000 (システム既定) アカウント有効 Yes アカウントの期限 無期限 最終パスワード変更日時 2021/05/15 18:54:13 パスワード有効期間 無期限 パスワード次回変更可能日時 2021/05/15 18:54:13 パスワードあり No ユーザーによるパスワード変更可能 Yes ログオン可能なワークステーション すべて ログオン スクリプト ユーザー プロファイル ホーム ディレクトリ 最終ログオン日時 2021/05/16 12:14:17 ログオン可能時間 日曜日 7:00:00 - 21:00:00 月曜日 7:00:00 - 21:00:00 火曜日 7:00:00 - 21:00:00 水曜日 7:00:00 - 21:00:00 木曜日 7:00:00 - 21:00:00 金曜日 7:00:00 - 21:00:00 土曜日 7:00:00 - 21:00:00 所属しているローカル グループ *Users 所属しているグローバル グループ *なし コマンドは正常に終了しました。
特定サイトへのアクセス制限
DNSサービスを利用します。DNSは電話帳のようなもので、「blog.ss-blog.jp」のようなドメイン名を「99.84.142.5」のようなIPアドレスに変換するための仕組みです。この変換を行う時に不適切なサイトのドメイン名をフィルターして別のサイトへ誘導するようなOpenDNS FamilyShieldというサービスを利用します。
DNSサーバーの情報は普通はパソコンの起動時にDHCPでIPアドレスと共に自動的に設定されることが多いのですが、個別に設定することもできます。OpenDNS FamilySheldのDNSサーバーのIPアドレスは208.67.222.123と208.67.220.123ですので、これらのIPアドレスを使うようにDNSを設定します。詳しい設定方法はこちらに記載されています。これも管理用アカウントで実行してください。
もう少し優しい記事を参考にしたい場合は「windows10 DNSサーバーを手動設定する」で検索してわかりやすいページを探してみてください。設定例ではGoogleのDNSサーバーを使うことが多いようですが、今回使うのは208.67.222.123と208.67.220.123です。例にある8.8.8.8などと間違えないように注意してください。
このDNSの設定はネットワークインターフェースに対して行うので、子供だけでなくPC上のすべてのユーザーに適用されます。また、WiFiとイーサネットなど複数インターフェースがある場合は、すべてのインターフェースでこのDNS設定を行うことをお勧めします。
確認
設定は以上です。完了したら子供用のアカウントでWindows 10にログインし、制限したいサイトがちゃんとブロックされているかどうかブラウザで確認してみてください。設定した利用時間帯外でログインが制限されていることも確認してくださいね。
How to separate access log from app log in Restlet [技術]
This is a memo on Restlet logging configuration based on java.util.logging. There is an article in Talend's site, but the description was not all that clear to me. I had trouble separating app log from access log and it took almost one full day to figure this out. The Restlet version I used is 2.3 because that is the stable version available in Maven repository.
In short, you need 2 separate loggers configured in the app, one for app log and the other for access log. This may be obvious if you know java.util.logging well. It is worth noting that the access log comes from the Restlet framework itself even though you modify its behaviour by configuration. You do not write particular code for access logs, except for initialization.
The following is the configuration file for java.util.logging. I call it "logging.config".
In the first part, I declare two different name spaces, one for app logging (com.example.myapp) and the other for access logging (com.example.myapp.www). Each one refers to a log handler in the bottom half. I have written a small Java code "com.example.myapp.LogFormatter" for log formatting, which is referenced from FileHandler configuration.
Then I give it to JVM by this parameter at startup:
Next, in my code, I have configured two separate loggers as follows. Both are in the initialization section of the program. The first one is for app logging.
The Java package name "com.example.myapp", or reverse domain name, whatever you call it, can be anything as long as it matches the namespace in the configuration file.
Then, the second set of parameters will let the Restlet framework write access logs to a separate file whenever a request comes from a client. This is the code to configure the framework:
Again, the package name "com.example.myapp.www" must match the configuration in logging.config.
The configuration file and codes combined, I could separate access log from app log in two distinct files.
In short, you need 2 separate loggers configured in the app, one for app log and the other for access log. This may be obvious if you know java.util.logging well. It is worth noting that the access log comes from the Restlet framework itself even though you modify its behaviour by configuration. You do not write particular code for access logs, except for initialization.
The following is the configuration file for java.util.logging. I call it "logging.config".
# These are for app logging.
com.example.myapp.level=ALL
com.example.myapp.handlers=java.util.logging.FileHandler
com.example.myapp.useParentHandlers=false

# These are for access logging.
com.example.myapp.www.level=INFO
com.example.myapp.www.handlers=org.restlet.engine.log.AccessLogFileHandler
com.example.myapp.www.useParentHandlers=false

# Referenced from com.example.myapp
java.util.logging.FileHandler.level=ALL
java.util.logging.FileHandler.formatter=com.example.myapp.LogFormatter
java.util.logging.FileHandler.limit=10000000
java.util.logging.FileHandler.count=5
java.util.logging.FileHandler.pattern=./myapp-%u-%g.log

# Referenced from com.example.myapp.www
org.restlet.engine.log.AccessLogFileHandler.level=ALL
org.restlet.engine.log.AccessLogFileHandler.limit=10000000
org.restlet.engine.log.AccessLogFileHandler.count=5
org.restlet.engine.log.AccessLogFileHandler.pattern=./myapp-access-%u-%g.log
In the first part, I declare two different name spaces, one for app logging (com.example.myapp) and the other for access logging (com.example.myapp.www). Each one refers to a log handler in the bottom half. I have written a small Java code "com.example.myapp.LogFormatter" for log formatting, which is referenced from FileHandler configuration.
Then I give it to JVM by this parameter at startup:
-Djava.util.logging.config.file=./logging.config
Next, in my code, I have configured two separate loggers as follows. Both are in the initialization section of the program. The first one is for app logging.
import java.util.logging.Logger;
...
// for app log
logger = Logger.getLogger("com.example.myapp");
...
logger.info("This is app log.");
The Java package name "com.example.myapp", or reverse domain name, whatever you call it, can be anything as long as it matches the namespace in the configuration file.
Then, the second set of parameters will let the Restlet framework write access logs to a separate file whenever a request comes from a client. This is the code to configure the framework:
import org.restlet.Component;
...
Component component = new Component();
// for access log
component.getLogService().setLoggerName("com.example.myapp.www");
Again, the package name "com.example.myapp.www" must match the configuration in logging.config.
The configuration file and codes combined, I could separate access log from app log in two distinct files.
Adventurer3でモデルに横ずれが出る問題を修正するクサビを作ってみた [技術]
FLASHFORGEのAdventurer3でモデルを出力すると時々横方向におかしな線が入ったり、途中で全体的に左や右にずれたりします。ネットを見ていたら「X方向に台座がズレる」と書いてある記事がここやここに見つかりました。これは3Dプリンターとしては致命的な欠陥のような気がします。手持ちのユーザーガイドには特にそんなこと書いてないし。出力中はビルドプレートを固定できるような構造にするとか、固定するための小物を付属品として同梱するとか、改善してほしいな。
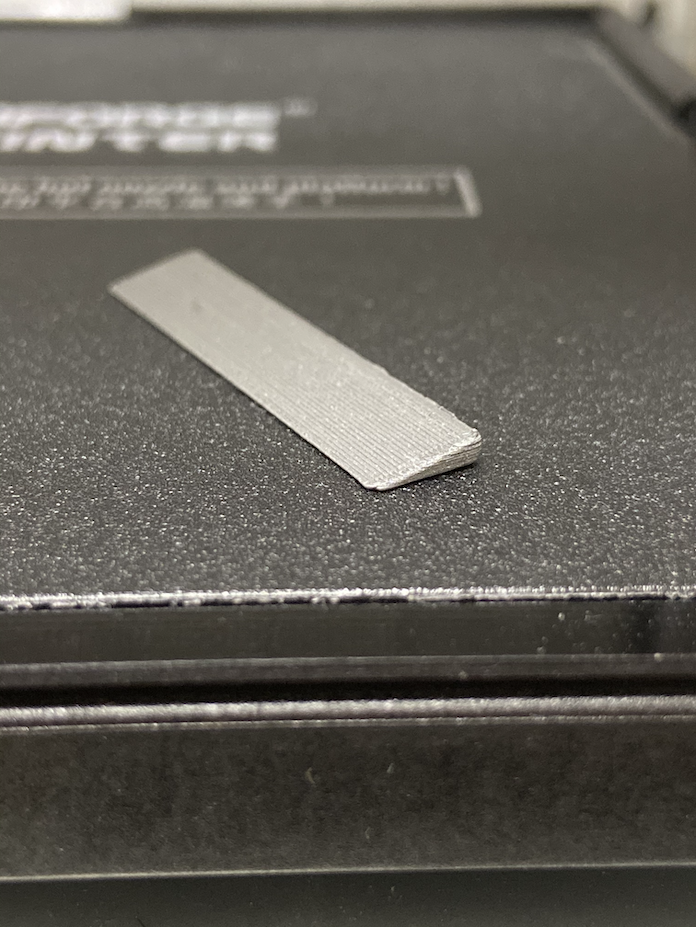
さて、愚痴っていても解決しないので自分でなんとかしないと。Adventurer3のプラットフォームベースには左右の中央ににわずかな切り欠きがあります。奥行きは5cm程度です。上にリンクした記事ではこの隙間に爪楊枝を詰めたりして解決しているようなので、Adventurer3で詰め物を作ってみました。幅40mmx高さ8mmx厚さ最大2mm程度のクサビです。モデリングはBlenderで適当にやっつけました。このクサビを5cmの隙間に挟むと、少なくともビルドプレートを指でずらすことはできなくなり、固定できたようです。
全体像
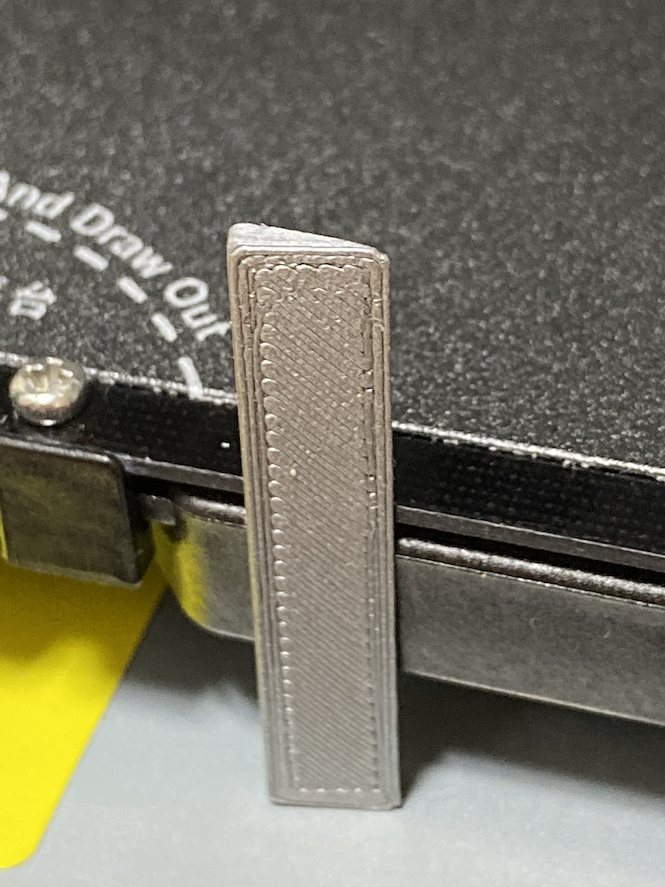
立ててみた
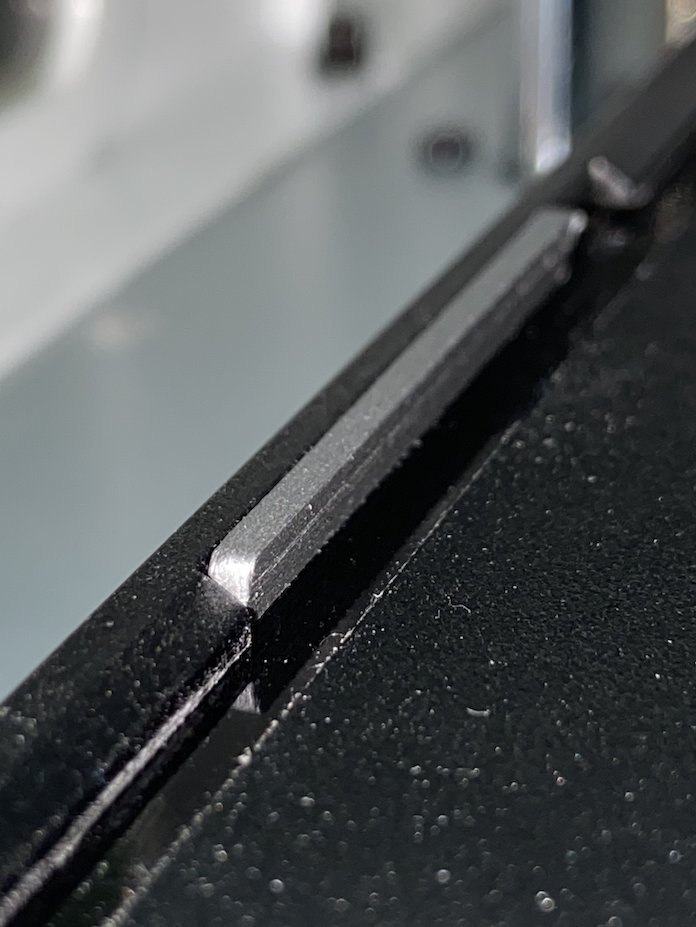
隙間にはめたところ
このブログではGXやSTLは残念ながら添付できませんが、BlenderやFreeCADのようなアプリで簡単に作れますよ。
適当に出力したらぐちゃぐちゃになって、全部ヘッドに張り付いて一度失敗したものの、FlashPrintのパラメータの調整でなんとか綺麗に完成しました。こんな感じです。
Resolution: Hyper
Layer Height: 0.08mm
Print Speed: 10mm
Fill Density: 100%
Extruder: 210°C
Platform: 50°C
ラフトなし
サポートなし
使ったのはPLAのメタルフィラメントです。たまたま今それが刺さっているからという以外には特に理由はありません。フィラメントの使用量は16cm程度ですので、半端に余っていて使い道のないフィラメントを消費できます。所要時間も25分程度ですよ。
クサビを刺した状態でモデルを出力してみたところ極端な横ずれは解消できたようです。ところが今度はY(前後)方向のズレが気になるように。ヘッドが低すぎて時々造形物にぶつかり、その勢いでプラットフォームが動いてしまうのかも。次はヘッドを少し上げてみようかと思います。
注意点を一つ。これを右の隙間に刺して出力すると、なんらかの理由でモデルが右端の中央あたりにくる場合に送風口(ダクト)がクサビに引っかかっります。そのせいでプラットフォームを前後に移動させるギアから悲鳴がガリガリガリガリッ。壊れかねないので左の隙間に挿しましょう。左にも送風口があるタイプのヘッドもどこかで見た気がするのですが、その場合はクサビをちゃんと設計することをお勧めします。自作するのでなければ爪楊枝がお手軽ですかね。
2021/5/29追記
去年書いたこの記事はそれなりにアクセスがありますが、その後ネットを見ていて間違っている気がしてきました。
横ずれは出力したモデルにノズルが衝突するのが原因なので、ビルドプレートがずれないようにするのではなく、ノズルの高さを少し上げて、出力したモデルにノズルが衝突しないように調整して解決するのが正しそう。
さて、愚痴っていても解決しないので自分でなんとかしないと。Adventurer3のプラットフォームベースには左右の中央ににわずかな切り欠きがあります。奥行きは5cm程度です。上にリンクした記事ではこの隙間に爪楊枝を詰めたりして解決しているようなので、Adventurer3で詰め物を作ってみました。幅40mmx高さ8mmx厚さ最大2mm程度のクサビです。モデリングはBlenderで適当にやっつけました。このクサビを5cmの隙間に挟むと、少なくともビルドプレートを指でずらすことはできなくなり、固定できたようです。
全体像
立ててみた
隙間にはめたところ
このブログではGXやSTLは残念ながら添付できませんが、BlenderやFreeCADのようなアプリで簡単に作れますよ。
適当に出力したらぐちゃぐちゃになって、全部ヘッドに張り付いて一度失敗したものの、FlashPrintのパラメータの調整でなんとか綺麗に完成しました。こんな感じです。
Resolution: Hyper
Layer Height: 0.08mm
Print Speed: 10mm
Fill Density: 100%
Extruder: 210°C
Platform: 50°C
ラフトなし
サポートなし
使ったのはPLAのメタルフィラメントです。たまたま今それが刺さっているからという以外には特に理由はありません。フィラメントの使用量は16cm程度ですので、半端に余っていて使い道のないフィラメントを消費できます。所要時間も25分程度ですよ。
クサビを刺した状態でモデルを出力してみたところ極端な横ずれは解消できたようです。ところが今度はY(前後)方向のズレが気になるように。ヘッドが低すぎて時々造形物にぶつかり、その勢いでプラットフォームが動いてしまうのかも。次はヘッドを少し上げてみようかと思います。
注意点を一つ。これを右の隙間に刺して出力すると、なんらかの理由でモデルが右端の中央あたりにくる場合に送風口(ダクト)がクサビに引っかかっります。そのせいでプラットフォームを前後に移動させるギアから悲鳴がガリガリガリガリッ。壊れかねないので左の隙間に挿しましょう。左にも送風口があるタイプのヘッドもどこかで見た気がするのですが、その場合はクサビをちゃんと設計することをお勧めします。自作するのでなければ爪楊枝がお手軽ですかね。
2021/5/29追記
去年書いたこの記事はそれなりにアクセスがありますが、その後ネットを見ていて間違っている気がしてきました。
横ずれは出力したモデルにノズルが衝突するのが原因なので、ビルドプレートがずれないようにするのではなく、ノズルの高さを少し上げて、出力したモデルにノズルが衝突しないように調整して解決するのが正しそう。


